Showing posts with label tutorial. Show all posts

Saturday, May 18, 2013

How to: Effortless Glowy Skin

If you've been following me for a while, you probably know that I absolutely love a glowy/ dewy foundation finish. As my skin is dry/ dehydrated I love looking like I have a healthy glow and here's how I achieve it!
 Firstly you will want to start with your primer to ensure your makeup lasts all day. Lately I have been using Arbonne's Virtual Illusion makeup primer mixed with Majolica Majorca Skin Lingerie Porecover, although pores are not my main skin concern & this is meant to be for oily skin. If you have oily skin I'd recommend a primer to control that, but if you have dry skin there are many types of primers that help add an extra glow such as Face of Australia's Face Base with Vitamin E & Chamomile, Essence's My Base Illuminating Makeup Base or alternatively you can mix something like Becca's Shimmering Skin Perfector or MAC Strobe cream in with a primer.
Primer only, and bad lighting/ angle but bare skin. Yuck haha
 Now you can apply your foundation, or concealer if you prefer to do it beforehand, but for an extra glow you can mix an illuminizer on the back of your hand for an all over glow or only on certain areas. The latter is better for oily skin as usually an all over shine is what you are trying to avoid.
 Rimmel Wake Me Up is illuminating enough as it is so I don't really need to mix it with MAC's Strobe Cream but if you use a foundation with a matte/  satin finish it will add glow only where you want it. I've dabbed it only onto my cheekbones, nose & chin but you can also do center of the forehead & cupids bow. I only occasionally do this step.
I have already applied my concealer on blemishes & under my eyes. I also lightly go over my lips & eyebrows as a base.
 If you have chosen to skip mixing an illuminator with your foundation, I would recommend using a cream colour base (CCB), such as MAC's CCB in Pearl or Hush, depending on your skin tone. My cheap 15 concealer palette from eBay also has a highlighter shade in it too. I use my fingers to dab this on the same places as the Strobe cream. You want to do this after foundation & concealer & before powder.
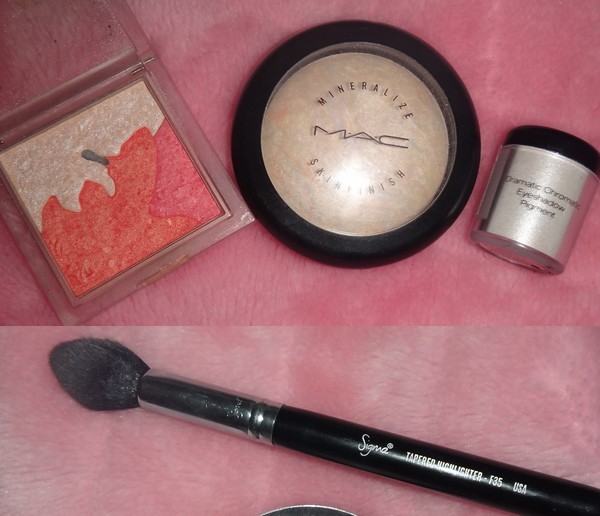
 You will also want to set your CCB with a powder for longevity. There are soo many different highlighters out here but here are a few of my options; Revlon A Floral Affair in Hushed Blush, the lightest shade obviously, MAC Mineralize Skin Finish in Lightscapade, Nyx Dramatic Chromatic Eyeshadow Pigment in Pearl White. I have been using Lightscapade pretty much every day since I bought it in November & it has just started to loose the dome shape. I also use the Sigma F35 brush to apply it.
The difference isn't as notable unlike if I used a matte or satin foundation & no illuminizer at the start, but it is more noticeable when the full face is finished.
Bourjois Delice de Soleil bronzer, RT blush brush for bronzer, Milani Baked blush in Luminoso, Furless Blush brush.
 Here is what I applied on the rest of my face (not pictured, Rimmel Stay Matte powder dusted lightly all over). Can you see the film developing over the Bourjois bronzer, has this happened to anyone else? It's barely pigmented enough as it is! This baked blush furthers the glow but you could use a matte blush if it is too much for you.

Aand the absolute finished product complete with eyeliner & lipstick (MAC Hue), oh and eyebrows, but no eyeshadow since I ran out of time before work!! So this is basically what I do every day, give or take a few steps, to keep my skin looking healthy & glowing.

Top tips to remember (TL;DR version)
 -If you have oily skin use a mattifying primer and a matte/ satin finish foundation and spot highlight so you don't look shiny all over
-Use cream/ liquid products where possible if suitable for your skin type & lightly powder with similar colours for longevity
-Use a light reflecting concealer underneath the eyes only if you have dark circles otherwise the dewyness will not be as effective

I hope you find this informative & easy to understand, I'd love to hear all feedback!
Let me know if you prefer a glowy or matte look!

xx

Saturday, May 4, 2013

Nyx Eyebrow Cake Powder // Review & How To

 Ever since I ran out of my E.L.F Eyebrow Kit ages ago, I have been just using the dark brown eyeshadow from the Sleek Storm palette, and after I hit pan on that big time I went to the darkest brown in the Wet n Wild Vanity Palette. But I have been wanting to use an eyebrow kit for the longest time now, so I thought I would give NYX's eyebrow cake powder a go, and have been using it for over a month now.


Packaging: Quite bulky but still small & good for traveling, has a see through lid that opens on the left side, which is annoying when you are right handed.
Texture: Wax is thick but not chunky & holds brows in place, although mine don't usually go hay wire. The powders are like regular eyeshadow.
Color Selection: Black/ Gray, Dark Brown/ Brown, Taupe/ Ash, Auburn/Red, Brunette & Blonde. I have it in Dark Brown/ Brown, which I am glad I got because I like my eyebrows quite dark.
There is only a very slight difference in the 2nd colour being slightly warmer & lighter.
Brushes: It includes a mini spoolie brush & slanted brush, but with most brushes that come in kits
like these are pretty useless when they are too small to grab, and these are hard to get out of the compartment, so I have to tip the kit upside down. I do like to use the spoolie to brush through my brows before & after, and the slanted brush is good for the wax because it is quite stiff, and if I use it only for that use the wax won't go murky & gross.

Longevity: These last all day for me, even without the wax but for added security the wax will help it hold for as long as possible.


Application
At first I had no idea what order I should apply the wax, but I learned that applying it after the shadow made it go a bit streaky, so I apply it lightly first before the shadows as it also works as a base to help it last all day.
1. Apply wax using fingers or the angled brush. Also brush hairs into place if you have unruly eyebrows.
2. Using a stiff angled brow brush (I use the Real Techniques Brow Brush) & the first darker shade, outline the top & bottom of the eyebrow to the thickness you desire. If I want to make them a lot thicker than they are I use the lighter shade just on the edge of this line so they kind of fade out better. Fill in the middle- tail of the eyebrow with this colour.

3. Going in with the 2nd colour from the outside in of the start of the eyebrow using feathering motions. At the edge of the eyebrow I change the angle of the brush so it is pointing upwards and fade the eyebrow out.
 4. Brush through the brows to soften them if you need to.
 5. Optional: (I don't do this often) Using a highlighter pencil (I use Prestige Brow Duo in Illuminate) or a slightly lighter concealer, highlight underneath the brow & blend it out. If I go a bit too far underneath or take away from the arch I correct it here.
Compared to the unmade eyebrow. This is probably not my best effort & I did go heavier with the powder but you can see the difference this makes. I wouldn't do my eyebrows this harsh if I wasn't planning to wear eyeshadow as I think a softer eyebrow looks better with bare eyes. Don't forget eyebrows are sisters & not twins so as long as they aren't completely different don't be too fussy!

Overall, the Nyx Eyebrow Cake Powder is a pretty good eyebrow kit that has the basics for filling in eyebrows. I probably don't like it as much as the E.L.F Eyebrow kit as it had a coloured wax & eyeshadow compared to 3 different products & the packaging is less bulky. However I would still recommend this kit & give it a 7/10.

What do you like to use on your eyebrows?
xx

Tuesday, October 30, 2012

Glam Smoky Eye Picture Tutorial

While I was doing this makeup for an engagement party I thought I may as well take pictures from each step for another tutorial. This is very similar to the eye's I wore here except a bit more glammed up with optional glitter, using the Urban Decay Naked 2 palette. Keep reading to see how to do this look!


Step 1. Prep & prime your eyes. Apply tape to the outer corner of your eye at a desired angle (you can see I remembered to do it in the 2nd step lol). Apply a sticky eye base if desired. I used Nyx Jumbo Eye Pencil's in Cottage Cheese (C.C) & Slate to match the e/s colours, applying C.C 3/4 of the lid & Slate in the outer 1/4.
 Step 2. Blend out & apply more if needed. Only add a little bit at a time to avoid creasing later on.
 Step 3. Apply Verve (Satin silvery-white colour) from the Urban Decay Naked 2 palette over the top of C.C.
 Step 4. Apply Pistol (Satin Slatey-grey) over the top of the Slate JEP.

Step 5. Blend Tease (Matte taupe y-purple) into the crease & blend out further with Foxy (Matte light skin-tone colour)

 Step 6. Apply Blackout (matte black) into the outer v, bringing down into lashline & blending with a fluffy brush.

Step 7. Using your fave eyeliner (I used Maybelline Master Precise) & apply it in whatever way you like the most. If you want to wing it out just follow the tape for an ultra precise line.


Step 8. Apply C.C into the areas you wish to highlight (brow bone, inner corner)

Step 9. Blend & apply Bootycall (Shimmery highlight colour) over the top.

Step 10. Rip off that tape! Apply C.C again to the lower lash line & apply Verve over the top. Don't worry about the mess, you can fix it up with undereye concealer afterwards. Also apply Pistol to the outer half of the lower lashline. You can blend it up into the outer corner if you like but I'm going to leave mine unblended.
 Step 11. Optional: Apply a silver glitter over the eyeshadow you have applied on the lower lashline (that was to give it more dimension if needed). Set with a glitter shadow so you don't have to wait forever for it to dry. I used Nyx Candy Glitter Eyeliner in Disco Ball & set with Nyx Glitter Mania in Silver.


Step 12. Apply a black gel eyeliner into the waterline. I used a black pencil dipped in my BYS Gel Eyeliner which I learnt from Marlena @ Makeupgeek & I really like doing it that way because it's easier & firmer to blend into the lashline than with a brush. You have to be careful not too get too much on, though. Oh haii I've suddenly decided to fill in my 'brows lol.


Step 13. Blend into the lower lash line & set with Blackout. Apply mascara to top & bottom eyelashes.
 Step 14. Apply lashes to glam the look up further (these are on there last legs haha so mankyy! Need to replace them!) & there you have it!
 & now to spam you with pictures of my face! Haha.


Looking nekkid!


 On the rest of ma face:
Australis Paparazzi Perfect Foundation, Nude by Nature Eye Definer, MAC Dollymix
Lips: Rimmel Shocking Pink with Maybelline Coral Crush (seriously best colour to mix with pinks!)

 Thanks for looking, I hope the tutorial is helpful & the pictures are clear. Leave your feedback about it!
xx