Showing posts with label Makeup Base. Show all posts

Saturday, May 18, 2013

How to: Effortless Glowy Skin

If you've been following me for a while, you probably know that I absolutely love a glowy/ dewy foundation finish. As my skin is dry/ dehydrated I love looking like I have a healthy glow and here's how I achieve it!
 Firstly you will want to start with your primer to ensure your makeup lasts all day. Lately I have been using Arbonne's Virtual Illusion makeup primer mixed with Majolica Majorca Skin Lingerie Porecover, although pores are not my main skin concern & this is meant to be for oily skin. If you have oily skin I'd recommend a primer to control that, but if you have dry skin there are many types of primers that help add an extra glow such as Face of Australia's Face Base with Vitamin E & Chamomile, Essence's My Base Illuminating Makeup Base or alternatively you can mix something like Becca's Shimmering Skin Perfector or MAC Strobe cream in with a primer.
Primer only, and bad lighting/ angle but bare skin. Yuck haha
 Now you can apply your foundation, or concealer if you prefer to do it beforehand, but for an extra glow you can mix an illuminizer on the back of your hand for an all over glow or only on certain areas. The latter is better for oily skin as usually an all over shine is what you are trying to avoid.
 Rimmel Wake Me Up is illuminating enough as it is so I don't really need to mix it with MAC's Strobe Cream but if you use a foundation with a matte/  satin finish it will add glow only where you want it. I've dabbed it only onto my cheekbones, nose & chin but you can also do center of the forehead & cupids bow. I only occasionally do this step.
I have already applied my concealer on blemishes & under my eyes. I also lightly go over my lips & eyebrows as a base.
 If you have chosen to skip mixing an illuminator with your foundation, I would recommend using a cream colour base (CCB), such as MAC's CCB in Pearl or Hush, depending on your skin tone. My cheap 15 concealer palette from eBay also has a highlighter shade in it too. I use my fingers to dab this on the same places as the Strobe cream. You want to do this after foundation & concealer & before powder.
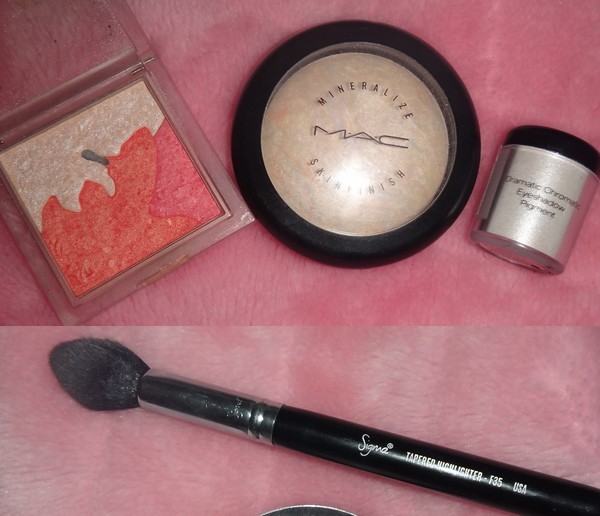
 You will also want to set your CCB with a powder for longevity. There are soo many different highlighters out here but here are a few of my options; Revlon A Floral Affair in Hushed Blush, the lightest shade obviously, MAC Mineralize Skin Finish in Lightscapade, Nyx Dramatic Chromatic Eyeshadow Pigment in Pearl White. I have been using Lightscapade pretty much every day since I bought it in November & it has just started to loose the dome shape. I also use the Sigma F35 brush to apply it.
The difference isn't as notable unlike if I used a matte or satin foundation & no illuminizer at the start, but it is more noticeable when the full face is finished.
Bourjois Delice de Soleil bronzer, RT blush brush for bronzer, Milani Baked blush in Luminoso, Furless Blush brush.
 Here is what I applied on the rest of my face (not pictured, Rimmel Stay Matte powder dusted lightly all over). Can you see the film developing over the Bourjois bronzer, has this happened to anyone else? It's barely pigmented enough as it is! This baked blush furthers the glow but you could use a matte blush if it is too much for you.

Aand the absolute finished product complete with eyeliner & lipstick (MAC Hue), oh and eyebrows, but no eyeshadow since I ran out of time before work!! So this is basically what I do every day, give or take a few steps, to keep my skin looking healthy & glowing.

Top tips to remember (TL;DR version)
 -If you have oily skin use a mattifying primer and a matte/ satin finish foundation and spot highlight so you don't look shiny all over
-Use cream/ liquid products where possible if suitable for your skin type & lightly powder with similar colours for longevity
-Use a light reflecting concealer underneath the eyes only if you have dark circles otherwise the dewyness will not be as effective

I hope you find this informative & easy to understand, I'd love to hear all feedback!
Let me know if you prefer a glowy or matte look!

xx

Thursday, December 27, 2012

Everyday face products I use.

When I post my FOTD's I don't usually go into depth about how many & what products I use on my face so I wanted to make one that you can refer to if you wish. These products are a mixture of my HG's, products I'm trying to use up & new products that I have started to wear daily. Click here to view my current foundation routine.

It looks like a lot more than what it is, really lol.


Daily Makeup
 Primer- I have been using the Face of Australia Face Base Primer for a while now & I've gone through probably about 3 bottles & I will continue to use it, as it is my HG primer. I love the way it makes my dry/dehydrated skin feel & helps my makeup to glide on smoothly. Sometimes I mix it with this Skin Lingerie Pore Cover (even though I don't really have apparent pores) however I don't know how much more longevity they give to my base because I don't want to go without it ;)

FoA Face Base is clear while the Pore Cover has  a slight pearly finish.
 These color correctors are from my 15 concealer palette, although they do the job I will probably buy a smaller palette with the correctors only on it. (colours aren't in this order in the palette) I have been using the lavender shade lately for under my eyes to help brighten them 'though sometimes I add a tiny bit of the yellow if I need it. I use the green concealer for any redness but only if I can be bothered.

  As you can see I've been trying to finish my Studio Direct Cosmetics concealer for a while, I use it before my foundation for build-able layers to ensure my blemishes are covered in the end result. It is actually a decent concealer but I have others to use as well once this is gone.

 I mix the Models Prefer Illuminizer with my foundation by dotting it on my cheekbones, nose, forehead & chin. I probably wont buy this particular product again, although it does the job well there is so many others I want to try, & I still have my MAC Strobe cream that I should probably use too. It has a pump but I *always* pump out waay too much so I just unscrew the whole lid & dot it on with the stick.

 I have only used my Rimmel Wake Me Up foundation occasionally as I was trying to use my other foundations but I have slowly given up on that because I couldn't resist it anymore. And although I've recently bought the Garnier BB Cream in Medium I love it already but it is a little bit darker for me which is good especially for in the summer time. But mixed with the Wake me Up which is in soft beige, while being a little bit lighter (or, matching my normal skin tone) means the colours both even out, & I feel that both formulas really work well together. I am in love with this combo!
Garnier BB Cream left, Rimmel Wake Me Up right.


I've recently started using this BYS Concealer stick in Medium for any left over blemishes after my foundation, you may see in the swatch that it almost exactly matches my skin tone so it is perfect for using for finishing touches, but sadly I feel that it doesn't really cover well, & prefer a liquid concealer for this. I may use it for concealing before foundation once I run out of my Studio Directs concealer.

For under eye concealer I am still using this Nyx Concealer Magic Wand in light but I think I will try the Rimmel Wake Me Up Concealer (because of Tanya Burr again, & the fact that their other face products are TDF) or the Nyx HD Concealer once I run out. If I need more brightening again I will use the Bourjois Healthy Mix Under eye concealer but only slightly.

 I have been using my MAC Mineral Skin Finish in Lightscapade  over the top of this shimmery cream from my 15 concealer palette pretty much everyday although I can skip the cream but it adds more longevity & helps it show up even more. This gives such a pretty glow although I am still lemming the MSF Soft & Gentle highlighter badly. I think it will take me forever to even make a dent in this MSF!
Top; cream concealer, Bottom; Lightscapade
 I have been a little bit obsessed with bronzing & contouring lately but I am trying to use up both of these products, this sample of Christian Dior Powder Blush in #849 Contour & my Nude By Nature Eye Definer in Contour which you have probably seen me mention a number of times but have no clue what it is. It is actually a really nice colour for contouring so I don't want to use up in too much of a hurry but as I start to run out I will use my Nyx Taupe Blush again. & I sort of like the Dior bronzer but it pulls a bit pink. I have just ordered Nars Laguna Bronzer so I am so excited to start using that! I have also started using my Physicians Formula Mineral Glow Pearls in Beige Pearl.


The very last step for my base is powder, and I have been using the Rimmel Stay Matte powder in Translucent everyday since I've bought it & it is amazing. Prior to that I used Palladio Rice Powder also in translucent which is nice too. I don't exactly have excess oil in my skin so although I like the dewy finish which can be achieved with highlighting, so I ensure everything lasts by setting it with a powder to help control the oil throughout the day (T-zone mainly as I already use powder on my cheeks) and I only slightly brush it over instead of buffing it right into the skin.

Evening/Special Occasion Products
 I have been using the Australis Paparazzi Perfect Foundation whenever I go out clubbing or any night time occasions for a while now, and I always mention it but many of you wouldn't know anything about it. I feel that it makes my skin look so flawless especially in photos as it is heavier, although unfortunately the SPF can catch in the light & make me look lighter in some pics. I like to set with my Australis Fresh & Flawless pressed powder in Deep Natural for extra coverage, & this is the powder I keep in my handbag to touch up during the day.


So that's basically the main products that I don't always mention but I'm sure most are probably curious to know! Let me know if you have any questions below, or if you use any of the same products!
Oh let me know if you would like to see a post about my HG products!

xx

Friday, October 5, 2012

My Updated Foundation Routine. Pic Heavy Step by Step

This is something which I think I will keep changing as I try new products & brushes but it's always nice to have an established base routine. Last year I posted this and while most of the products & techniques are the same but I like the results better.(wow I didn't realize how many things are *actually* the same! Most of the things used today are from my Project Empty.)
Please note: I had my eyebrows tinted the day before although one of them looks filled in :S I also pretty much always do my eye makeup first but because I was doing a neutral eye today I decided to do foundation first so you can see the effect properly.
 
(not my pic.. forgot to take my own.)


1. Start with your primer. I use Face of Australia Face Base. It makes everything go on so smoothly!
Eek naked! Yuck! So much more redness than usual.
2.As I have pigmentation rather than dark circles under my eyes, I use mainly a lilac concealer with a touch of yellow mixed in. I apply & blend with my ring finger. Also blend onto the eyelids (as mentioned I normally do my eyes first so I don't need to do this.)
3. I don't normally go this extreme, but since I had so much redness this day I applied the green concealer from the same palette to any discoloration.
4. Blend out with the Sigma f82. Don't I look lovely & pale! You may not want to do this if you only plan on wearing concealer on top haha.
5. Using your skin-toned concealer & brush, apply to any blemishes. If you have light blemishes you can skip this step. However if you have really bad scarring or cystic acne I'd recommend to do this now, it's also good for if your concealer doesn't exactly match your skintone. Use a heavier concealer in stick or cream form for better coverage, save liquids for after foundation.

The concealer is so light on first glance it blends into everything else, sort of. Don't forget around your nose!
6. Blend really well into the skin with the Sigma f82 brush or any flat top brush. To blend mainly push the concealer into the skin to avoid rubbing it away. My trick is to do as many layers as you need - remember that foundation counts as one-but be careful to use little product each time & blend well to avoid cakey-ness. Chucking one big pile of coverup will just turn cakey once powder is applied.
 7. If you like a matte finish/ have oily skin, skip this step. I pour some liquid illuminator into my fingers & pat all over the skin, not rubbing to avoid moving the concealer.

8. Once that's been patted into the skin, dot your foundation onto each area of your face to ensure you don't use too much. You can always add more if needed.
Haha I've just gone back to using what I used in last years routine! :P However that is only until these finally run out. I mix 2 different colours to match my skin tone.

 9. To buff my foundation in I still use my E.L.F Flat Top Powder brush. Don't forget to blend into the jaw & hair line. If needed add a tiny bit more of foundation to the areas that need it only. Also blend onto the eyes even if you're doing eyeshadow to fix colouration as a base for your primer. I tend to get it on my lips anyway but it also acts as a base for your lipsticks. (You don't want much otherwise the L/S will blend in with it & tone down!)
Yay I have colour again!

10. For under eye concealer I like something a little bit lighter, or you can match it to your skin tone. I use Nyx Concealer Wand in Light. Apply in a triangle shape under your eyes straight from the tube. Then I blend with a foundation brush from Essence of Beauty taking it out past my eye for a triangle highlighting effect to "pull" my eyes up & out.
11. Only if needed add a little bit of a light reflecting concealer, I applied mine right in the hollow part only & blended with the same foundation brush.
There's an obvious change between no-makeup to now, so I wanted to compare my under eyes to colour correction/ foundation only to under eye concealer. I hope you can notice a difference!

12. Using the same concealer wand but mixed light & medium together, I apply to any blemishes that may be showing still. Blend with f82 brush again, but also go all over the face to ensure foundation is pushed in.


13. Especially if I use cream blushes/ highlighters/bronzers, I will do my powder at the very last step to avoid applying cream over powder. I also save it because I may need to use concealer around the brows or lips again. So here I have applied my other face stuff (I may be doing a tut when I get my newly ordered brushes, yay!) I also apply lip balm to prepare my lips.

14. Lets pretend my eyes are done. It's time to apply powder, I still like the Palladio Rice Powder in Translucent to lightly set everything. I lightly dust with the E.L.F complexion brush all over but use the fan brush for lighter application under the eyes & around the nose & lips.

& Here I am with my eyes & lips done (more on this to come in another post)

Thanks so much for looking, even if you are happy with your routine I hope you can take some tips & tricks off of mine :) Everybody has different skin so this may not work for you & visa versa but I am happy with this for the minute. :D