Showing posts with label Eyebrows. Show all posts

Saturday, May 4, 2013

Nyx Eyebrow Cake Powder // Review & How To

 Ever since I ran out of my E.L.F Eyebrow Kit ages ago, I have been just using the dark brown eyeshadow from the Sleek Storm palette, and after I hit pan on that big time I went to the darkest brown in the Wet n Wild Vanity Palette. But I have been wanting to use an eyebrow kit for the longest time now, so I thought I would give NYX's eyebrow cake powder a go, and have been using it for over a month now.


Packaging: Quite bulky but still small & good for traveling, has a see through lid that opens on the left side, which is annoying when you are right handed.
Texture: Wax is thick but not chunky & holds brows in place, although mine don't usually go hay wire. The powders are like regular eyeshadow.
Color Selection: Black/ Gray, Dark Brown/ Brown, Taupe/ Ash, Auburn/Red, Brunette & Blonde. I have it in Dark Brown/ Brown, which I am glad I got because I like my eyebrows quite dark.
There is only a very slight difference in the 2nd colour being slightly warmer & lighter.
Brushes: It includes a mini spoolie brush & slanted brush, but with most brushes that come in kits
like these are pretty useless when they are too small to grab, and these are hard to get out of the compartment, so I have to tip the kit upside down. I do like to use the spoolie to brush through my brows before & after, and the slanted brush is good for the wax because it is quite stiff, and if I use it only for that use the wax won't go murky & gross.

Longevity: These last all day for me, even without the wax but for added security the wax will help it hold for as long as possible.


Application
At first I had no idea what order I should apply the wax, but I learned that applying it after the shadow made it go a bit streaky, so I apply it lightly first before the shadows as it also works as a base to help it last all day.
1. Apply wax using fingers or the angled brush. Also brush hairs into place if you have unruly eyebrows.
2. Using a stiff angled brow brush (I use the Real Techniques Brow Brush) & the first darker shade, outline the top & bottom of the eyebrow to the thickness you desire. If I want to make them a lot thicker than they are I use the lighter shade just on the edge of this line so they kind of fade out better. Fill in the middle- tail of the eyebrow with this colour.

3. Going in with the 2nd colour from the outside in of the start of the eyebrow using feathering motions. At the edge of the eyebrow I change the angle of the brush so it is pointing upwards and fade the eyebrow out.
 4. Brush through the brows to soften them if you need to.
 5. Optional: (I don't do this often) Using a highlighter pencil (I use Prestige Brow Duo in Illuminate) or a slightly lighter concealer, highlight underneath the brow & blend it out. If I go a bit too far underneath or take away from the arch I correct it here.
Compared to the unmade eyebrow. This is probably not my best effort & I did go heavier with the powder but you can see the difference this makes. I wouldn't do my eyebrows this harsh if I wasn't planning to wear eyeshadow as I think a softer eyebrow looks better with bare eyes. Don't forget eyebrows are sisters & not twins so as long as they aren't completely different don't be too fussy!

Overall, the Nyx Eyebrow Cake Powder is a pretty good eyebrow kit that has the basics for filling in eyebrows. I probably don't like it as much as the E.L.F Eyebrow kit as it had a coloured wax & eyeshadow compared to 3 different products & the packaging is less bulky. However I would still recommend this kit & give it a 7/10.

What do you like to use on your eyebrows?
xx

Monday, April 23, 2012

How I fill in my eyebrows tutorial

Eyebrows are definitely one of the most important features on your face as it frames everything so if your eyebrows are untidy your makeup may not look as clean as what you would like. It is important to get them shaped by a professional especially the first time around, and to upkeep with tweezing the extra hairs that are coming through or with regular waxing.
You may also have sparse brows that look unfinished, and a way to add a more polished look is to fill them in. You can get your eyebrows tinted to your desired colour but that wont define the shape.

I'm not going to go into eyebrows shapes and all of that however I did want to share how I filled mine in. It is really quite simple and is just another step in the morning that I believe I cannot go without :) So here it is.

Products


 At the moment I'm using an eyeshadow and a small angled brush to fill mine in, the e/s I'm using is the dark brown colour in the Sleek Storm palette which is darker than my natural eyebrow colour but not darker than my hair. I find if I get a bit heavy handed it can be too much, though. If you are blonde you do not want to go 10 shades darker than your hair, also be careful of ashy or redness in some browns.
 I used to use the ELF eyebrow kit in medium & as you can see it was well used, I like it because it has a wax that you apply first & then set with the powder. I'll definitely buy it again one day.
Optional: This is an eyebrow duo for highlighting and brightening (I only use the nude side for under my brows) Sorry for it looking a bit manky haha. You may also need concealer to clean up the edges if you wish.

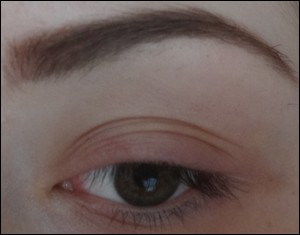
 Here is my naked brow. And eyes & face! yaay. My eyelashes are sad :( lol.
 Using the angled brush & shadow follow the top of the brow making small. short strokes. You don't want to change the shape here or it will look unnatural.
Do the same for the bottom, however it is ok to fill in the first half before the arch thicker and make sure it thins off towards the end of the brow.

 Fill in the leftover areas in the middle, making sure to still use short feathering motions to mimic the hairs. You do not want it to look too harsh. For the start of the eyebrow I just filled it in towards the center, if that makes sense, so it doesn't turn boxy looking.
 So that is how it is looking so far. Use an eyebrow brush if needed to take away the harshness. Stop here if you are happy with the shape & lines.

I applied concealer around the edges here (unblended so you can see) that I will blend out for neatness. If you do your foundation before your brows (which makes sense lol) leave concealer for the end.
With that blended out I applied the nude brow pencil under the arch- It's hard to see because of the concealer and not wearing and eye makeup, but you can leave it as it is or apply a shadow highlight on top to suit your eye makeup look.

Please let me know if this was helpful, confusing or not explained properly! I would love to hear your feedback.

Remember to never forget about your eyebrows :D