Sunday, November 27, 2011

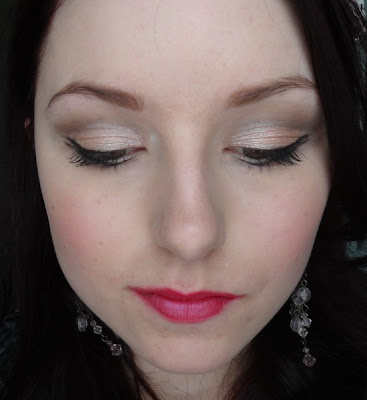
Neutral with a kick

Firstly a hello & thank you to the new followers!!
Haha I'm so lazy.. I have to edit my pictures all at once, & by then I may as well just post them all together. Its a lot easier haha :) Again they are neutrals, I haven't been too inspired with colour lately except for a few looks now & then. On to the pics!!


Hair colour no flash no sunlight
hair colour in the sunlight :)
Products: Stila Kitten
UD Smog
Darkhorse
A bit of Creep on top of the black e/l I think
blush is... awwwh I wish I wrote it down.. I think its Nyx peach blush
Nyx strawberry milk


Sleek Storm- Lightest Colour
Bronze colour over the top (so pretty much the same as my summer fresh look)
Coppery colour from the sleek palette in the outer V
The naked looking colour in the crease
Random purple e/l I got from ebay agess ago
Cheeks.. duno, haha not helpful I know sorry!
Lips are probably Rimmel Shocking Pink


Wearing a bump it... a bit hard to see here. I didn't have it far back enough for most of the day whoops
Nyx Vanilla Shimmer
Brown from 88 warm palette in crease
Nyx Black Bean JEP
Unsure of cheeks sorry
Nyx Chloe

as always thank you for looking!! Hope you've all had a good weekend.

Monday, November 21, 2011

New hair + Ice Queen FOTD

My hair was in desperate need of a colour, I liked the colour that I had before but I've had red in my hair for so long that I wanted to go more violet-y. & it still has some red in it so I like that :D
These pics were taken the day after so I made sure that I slept on my hair nicely haha. & to go with my new hair I wanted to do a more "special" look so yet again I tried a cut crease look (again haha) which I thought I had better try to name.


Products:
Nyx Cream Cheese JEP
88 Warm Palette
- Blue circle lid
- Orange crease
- Purple Crease/ Outer V
- Green eyeliner
Black Bean JEP as a base for the e/l

ELF Peachy keen

Nyx Summer Love [?]

& a bonus picture of our beautiful cat Mishka since I don't think I've posted one since she was a baby, when she was grey with black tips. She lost all her grey & turned orange/brown & black but is getting more greys again, hehe. This is how she likes to sleep =)


I was going to post a few looks into this one, but decided I liked too many pictures for that. bahaha
as always thanks for looking <3

Thursday, November 17, 2011

Summer Fresh Makeup

Just some more pictures with the same FOTD from my foundation tutorial...
When I was doing it I had more of a Victoria's Secret look in mind as I had just watched Transformers 3 the night before (major girl crush on Rosie & her hair & make up!) but in the end I think I strayed from the inspiration- oh well, I still like it & I think I may do this in summer when its too hot 2 do anything else because its quick & easy- minus the winged eyeliner, I think I might skip that.


Products~~
Eyes: NYX JEP in cottage cheese over the lid
the lightest colour in the Sleek Storm palette all over
Lightly blended a bronze colour into the outer corner, going slightly onto the lid
Bronzer in the crease
Lancome artliner
The Makeup Store e/l in Crazy Lazy (blue)

Cheeks: Nyx glow cream blush
bronzer that you cannot see haha

Lips: Bys lipstick in Coral Kiss

Thanks for looking
<33

Monday, November 14, 2011

My Foundation Routine (Pic Heavy)

So although my foundation routine has changed plenty of times over the years I am quite pleased with how I do it now, but I hope that I continue to improve it :)
So I think the title explains it all, lets get to it ;). Product list/ pictures are at the end


 Apply your primer! Beware the naked skin. You will see that I have blemishes to cover up, you can't really see the extent of the scarring though.


 Before anything else you will have to use your colour correctors first (green skin is not a good look haha) I only apply the green concealer if I feel like I need it.
 I blend out the yellow concealer with the foundation end of the Essence of Beauty brush. I find this is fluffier than other foundation brushes so I like it for this job.
Then with the concealer end I apply my concealer. In the same order that I applied it in each spot (nose, chin, cheeks, forehead) I blend it out with the brush again. You want to mainly blend the edges. Only apply a little bit of concealer at a time, you can always build it up if you need to, this prevents it from turning cakey.

Just showing ya after its blended out. This concealer is not a perfect match with my foundation so I don't want to apply it after. Damn I can see some spots I should have blended more, oh well.

 Now, Its foundation time. I like to apply a few dots to each spot on the head. I use 2 different foundations, a main one & one I'm trying to get rid of ha ha. I have also applied a highlighter to my cheek bones.
 I like the use the E.L.F flat top powder brush to stipple my foundation in. I usually start from the middle  & out but here I started from the chin. Once it is blended into the skin you can apply more foundation where needed.
Once that is done I dot a lighter concealer underneath my eyes, & a different concealer which matches my foundation on any spots that you can still see.

Once I have blended that out I use the larger end of the eyeshadow Essence of Beauty brush to apply powder to any spots that I concealed to set them.
I then use a fan brush to apply the rest of the powder to my face, mainly concentrating it on the T-Zone, a teensy bit under the eyes, & barely any over the cheeks. If you are oilier you may want to actually press the powder into the skin with another means, but since I am dry I only want to lightly set the foundation. 

 Here's me with nothing else done,
And after all the finishing touches!!! *more pictures of this FOTD to come*
~~Products~~
 I love this base as it is also moisturizing at the same time. I took it on the plane as a moisturizer/ primer for when it was time to do my makeup haha. You can buy it online here
 The colour correctors I used.
 Inglot concealers I applied before the foundation. I used the one in the middle which is a tad too yellow for me.
 PR is my main foundation, I am trying to use up the Australis one, it is a tiny bit darker but find they blend nicely together.
 The one in the pot is by Studio Direct Cosmetics which I bought on ebay, Its a bit light so I like that for under my eyes, & the physicians formula one is a good match for my foundation.
 I love this loose powder! Although its for oily skin it doesn't dry me out.
Brushes: L-R Essence of Beauty Conealer & Foundation brush (cut off the end of it in the pic oops) E.L.F flat top powder brush, Random fan brush, Essence of Beauty Eyeshadow brush (as mentioned I use the top or Blending end)

Thank you for looking, I hope it is useful to someone!

<33

Monday, November 7, 2011

A few different FOTD's + Nails

Hey guys, just a compilation of looks again.... nothing too exciting but since I took the pics I may as well post lol. Please excuse the oh so creative names of the looks. Its too hard to name them!!!
~Tropical Blues~
Just a bright blue look using colours from the 120 palette. Not a look I liked with my eyes closed but oh wells.


Of course I used Nyx JEP in Milk to get them brighter. I also used a purple for the eyeliner. I can't quite remember what I used on the cheeks (maybe ELF peachy keen) but on the lips is Nyx Summer love. 

~Purple & Pink~

 I used a BYS metallic palette for this, cheeks is uh I cant remember to be honest ha ha sorry, and lips is NYX fig.
An attempt at a waterfall braid.. IDK if you can see it here properly but it didn't turn out too bad.


 Another look using the same palette :] Cheeks are NYX pinky, lips are NYX Chloe dabbed on.

.:Nails:.
I wonder if you can guess what this is inspired from, hehe. I think that this is I think the first form of nail art I have actually done- I followed this tutorial one by Kayla Shevon. I only did Hello Kitty on my thumb on my left hand only because when I was doing the dots on my right hand I was shaking more than usual, haha. Of course it doesn't look anywhere near as good as hers but I think the dots turned out nicely! It was just something a bit more fun :) & I used a dotting tool that I got from ebay.

~

White with colourful spots- looking back on it now I could have made it colourful splatters, but it doesn't matter because I didn't really care if it was messy or not, to be honest. These pics were before clean up- I think. Usually I just wait until I have a shower & the messy edges disappear haha.

Thank you for looking :)