Tuesday, October 30, 2012

Glam Smoky Eye Picture Tutorial

While I was doing this makeup for an engagement party I thought I may as well take pictures from each step for another tutorial. This is very similar to the eye's I wore here except a bit more glammed up with optional glitter, using the Urban Decay Naked 2 palette. Keep reading to see how to do this look!


Step 1. Prep & prime your eyes. Apply tape to the outer corner of your eye at a desired angle (you can see I remembered to do it in the 2nd step lol). Apply a sticky eye base if desired. I used Nyx Jumbo Eye Pencil's in Cottage Cheese (C.C) & Slate to match the e/s colours, applying C.C 3/4 of the lid & Slate in the outer 1/4.
 Step 2. Blend out & apply more if needed. Only add a little bit at a time to avoid creasing later on.
 Step 3. Apply Verve (Satin silvery-white colour) from the Urban Decay Naked 2 palette over the top of C.C.
 Step 4. Apply Pistol (Satin Slatey-grey) over the top of the Slate JEP.

Step 5. Blend Tease (Matte taupe y-purple) into the crease & blend out further with Foxy (Matte light skin-tone colour)

 Step 6. Apply Blackout (matte black) into the outer v, bringing down into lashline & blending with a fluffy brush.

Step 7. Using your fave eyeliner (I used Maybelline Master Precise) & apply it in whatever way you like the most. If you want to wing it out just follow the tape for an ultra precise line.


Step 8. Apply C.C into the areas you wish to highlight (brow bone, inner corner)

Step 9. Blend & apply Bootycall (Shimmery highlight colour) over the top.

Step 10. Rip off that tape! Apply C.C again to the lower lash line & apply Verve over the top. Don't worry about the mess, you can fix it up with undereye concealer afterwards. Also apply Pistol to the outer half of the lower lashline. You can blend it up into the outer corner if you like but I'm going to leave mine unblended.
 Step 11. Optional: Apply a silver glitter over the eyeshadow you have applied on the lower lashline (that was to give it more dimension if needed). Set with a glitter shadow so you don't have to wait forever for it to dry. I used Nyx Candy Glitter Eyeliner in Disco Ball & set with Nyx Glitter Mania in Silver.


Step 12. Apply a black gel eyeliner into the waterline. I used a black pencil dipped in my BYS Gel Eyeliner which I learnt from Marlena @ Makeupgeek & I really like doing it that way because it's easier & firmer to blend into the lashline than with a brush. You have to be careful not too get too much on, though. Oh haii I've suddenly decided to fill in my 'brows lol.


Step 13. Blend into the lower lash line & set with Blackout. Apply mascara to top & bottom eyelashes.
 Step 14. Apply lashes to glam the look up further (these are on there last legs haha so mankyy! Need to replace them!) & there you have it!
 & now to spam you with pictures of my face! Haha.


Looking nekkid!


 On the rest of ma face:
Australis Paparazzi Perfect Foundation, Nude by Nature Eye Definer, MAC Dollymix
Lips: Rimmel Shocking Pink with Maybelline Coral Crush (seriously best colour to mix with pinks!)

 Thanks for looking, I hope the tutorial is helpful & the pictures are clear. Leave your feedback about it!
xx

Saturday, October 27, 2012

My Lipstick Inventory Part 1: Pinks

I've been working on this for the longest time haha. The only thing is I've been too lazy to do a whole lot of lipstick swatches but yay I did it, even if my lips were hurting at the end :P I was actually inspired by a post by the lovely Karima a while back to go through my lipsticks & see how many are actually similar.
Please look past the messy application, the closeups were mainly so you can see the colours. Unfortunately not all are as accurate as what I would like =/

For most of these lipsticks I will link them to when I've used them in FOTD's so please check it out so you can see what it looks like with other makeup & full-faced!

Light Pinks
 L-R: BYS Foxy Fuchsia, Revlon Colorburst in Candy Pink, Nyx Round Lipstick in Strawberry Milk, Nyx Round Lipstick in Harmonica, Nyx Soft Matte Lip Cream in Tokyo

Sorry for the dodgy copy & paste, found the first one afterwards. Order as above.
Depending on how much you apply, in flash lighting it can look hot pink, especially with the lipgloss on the other end of the tube. I used it in this FOTD here.

This is a really pretty satin-y light pink with buildable colour. Used in the first FOTD here. Last FOTD in this post and here too.
 This doesn't apply too nicely on it's own unless you apply, blot & repeat until it's opaque but looks nice layered over other lipsticks like what I've done here (second look) & underneath a nude lipgloss here
As the name suggests, a milky pink colour. Used here, here & here


Although it doesn't look like it, this is (again, in the name) a light matte pink that is super pretty, I used it here but with lip balm so of course it again doesn't look matte lol. Oh & in the 2nd FOTD here too

Medium Pink
Of course they all have to turn out looking the same, but in fact they pretty much are. I would not be able to choose which ones to remove from my collection though, if I had to downsize! Maybe y'all will be able to see a difference? I wont bother describing these because its so repetitive.

 L-R Nyx Round lipstick in Fig, Topshop lipstick in Show Off, Rimmel lipstick in Pink Flame, Australis lipstick in Salsa, Revlon Matte lipstick in Pink About it.
 Used here
 Lighting does not do it justice unlike in this FOTD     & in this night look.
 Although it looks red, *apparently* I used it here
Used in the first FOTD, which is really accurate. But depending on the lighting sometimes it looks a lot corally or pink.
Matte, used here.

 Hot/ Bright Pinks 
Everybody needs a few bright pink lippies in their collection!! & here are mine...


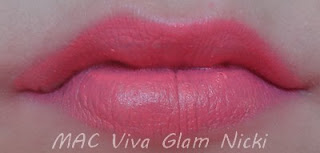
 L-R Nyx Round Lipstick in Narcissus, MAC Viva Glam Lipstick in Nicki,  Sleek Matte lipstick in Amped, Milani lipstick in Rosehip, Nyx Soft Matte Lip Cream in Addis Ababa.
A super bright, fun pink! Used here. 
Definitely a fave! It looks totally different depending on the lighting. Love it when it looks neon! Used here, here, here, aaand here (this was actually easy to find in my posts, everything else has been a pain!)
 Gorrgeous matte pink! Used here.

Hot satin pink! Used ( although warmed up with coral) in this ombre lips look, and here.
Usually looking more matte, but a hot hot pink. I swear I would have used it in a post before but I cannot find any for the love of god.

Fuschia 

 L-R Elizabeth Arden Lipstick in Pink Punch, Revlon Colorburst in Fuschia, Nyx Round Lipstick in Spellbound, BYS longwear lipstick in Flirty Fuschia, Ulta3 lipstick in Harem pink, Rimmel Lipstick in Shocking Pink
 A really sheer frosty fuschia.
One of my faves, an easily buildable lipstick for a light or heavy application. Used in this first FOTD
 Creamy pink that usually looks hotter than this. (maybe I should have put this under a different category haha)
 Hot pinky- fuchsia
Matte hot pink. Haven't used this in ages but dug it out just in case anyone is looking for a colour like this.


One of my faves, a really dark fuschia pink that looks good in different ways. Used here, Here (truest to colour)

Thanks for looking, I know a lot of the swatches are very similar, and I'm sure I could easily downsize my lipstick collection, but they would be too hard to choose!!

Also if I had to choose my top 5 pink lipsticks, here they are (in no order):
MAC Viva Glam Nicki (no competition, really!)
Rimmel Shocking Pink
Sleek Amped (or Milani Rosehip, hard to choose between these)
Revlon Candy Pink
Nyx Addis Ababa

P.S in no way is this going to stop me from buying more colours :P
Thanks for looking xx