Saturday, June 30, 2012

Recent Makeupgeek order

Ever since getting all of these MUG shadows I have needed a Z palette because it gets so damn frustrating opening the little packets each time haha. YAY that's taken care of. I also wanted to try one lipstick & one more eyeshadow.. for now... (Disclaimer: paid for everything with my own monies, not sent for reviewing)

As always great customer service, still the average ~2 weeks for it to arrive to me though, but that happens when you're on the other side of the world.

 My newly filled Z palette, & the lipstick in the box it comes in. What else can you spy in this picture?

This palette is meant to hold 29 shadows in, I think? I swear I read that somewhere, but now that I look it up I can't find it, lol. I think I only have room for 5 more lol, which means I can fit in 27. 
The case is made out of what feels like a strong cardboard with a magnetic base, and has a plastic window so you can see what's inside. It feels really sturdy. These pans are magnetic so they stick to it, but it also comes with spare magnets that can stick on the back of depotted eyeshadows.
It cost me $18.99 for this size. Yay to purdy palettes ^.^
The newest MUG shadow I bought was Mango Tango (2nd bottom row, 2nd from right).

First impression of this lipstick is the packaging, which is very sleek. I love the little touches like the detailing on the tubing. 2nd is the smell- quite the "lipsticky" smell I remember from when I was younger, but this is not a problem for me because I cant notice it after. I got this in the colour "Shy", a nice nude, pinky colour. It applies creamy & feels moisturizing. A big yay from me lol. The only thing with this in the packaging is that it's hard to see what colour it is- although the tip of it is clear you can't tell unless you open it (or look at the label on the bottom lol)

 Swatches of the lipstick & eyeshadow in artificial light at night.
Swatches in natural light. Can't wait to use Mango Tango on my eyes, looks like a lovely corally colour. I can see this being nice as a blush as well.

And if you played I Spy in the first pic, but didn't find it!!
I don't think I've introduced little Chester on here- We've had him for a while & hes so adorable & handsome!! He looves my pink fluffy blanket, as soon as he touches it he starts purring & massaging. :D

Thanks for looking!! I hope this can convince you to get a z palette if you've been thinking of it- now I want moar single eyeshadows to depot all the things! hehe.

Thursday, June 28, 2012

Barbie Girl Makeup!


I wasn't sure what makeup I wanted to do on the weekend for a "Barbie & Ken" themed party, but I remembered an older makeup look where someone said I probably looked like a barbie haha so I pretty much just copied that, so they are very similar. I did like the shape of this one a lot more, though. 
I also did my friends makeup for that night :)


I fixed the lipstick up after these pics lol. Also this is a weird face =S
~Products~
Face:
Australis Paparazzi Perfect Fdtn in Nude
Coastal Scents 15 concealer Palette
Bourjois Healthy Mix concealer
Milani Baked Blush in Luminoso
Nude by Nature Eye Definer (for contouring)

Eyes:
Nyx Black Bean JEP
Sleek Bad Girl: Noir, Blade (Crease, over the top of Black Bean)
Nyx Milk JEP (lid)
MUG Razzleberry E/S
Nyx Hot Pink glitter (dabbed over the top of Pixie Epoxy)
Eyelashes: Top- Red Cherry #79
Bottom: RC #502 (first time using these,so they're not perfect!)

Lips:
Nyx Hot Pink L/L
Rimmel Shocking Pink L/S

With & Without Flash

This is my beautiful friend Nicole, she was going as "Ice Barbie" & she usually wears softer makeup so I wanted to do it for her tonight :D

Black could have been blended better, yadda yadda haha
What I used on her:
The Face Shop shade stick (silver)
Sleek Bad Girl: Blade (all over lid) Noir (outer corner) [both also on lower lashline] Innocence (highlight- for some reason it showed up on one eye more than the other)
Nyx Candy Glitter liner in Disco Ball (wahh couldn't get it to show up properly on camera)
BYS Gel Eyeliner (Made it a bit too thick so I went over the top slightly with some of the glitter)
Rhinestones on outer corner of eyes (they kinda look like piercings though haha)

Also how I had my nails
Same method that I did my nails here, except I used a matte top coat by China Glaze over the top of the blue only. I used O.P.I Blue My Mind, and a random silver from Sportsgirl. Excuse the cuticles!
I think the matte has faded now, since I haven't applied it since or the silver will turn funky. (keep in mind it's been a few days, I also couldn't apply a top coat over it all or it would ruin the effect so it's not the longest lasting mani)

Aaand a few other pictures from that night
 Being a creeper heheh
SO & I in the barbie booth!!
Thank you for looking!!
If you were to dress up as a barbie, what would you be?? & how would you do your makeup? :)

xx

Saturday, June 23, 2012

Deep Sea Mermaid

Hey guys! This is just a look from last week where I used darker blues & greens. I have wanted to do this combo for a little while with my makeup geek eye shadows and it came out a little "deep sea mermaid"-y to me, haha. And it's nice & smoky for those rainy days.


~Products~
Face: I am still using up older face products! This while take me a while but I'm not going to buy any more foundation until its gone (unless I find something cheap then I will buy it but not open it lol)

Eyes: Makeup Geek E/S: Sea mist (Middle of lid)
Envy: Inner & outer eyelid
Corrupt: Crease
Shimma Shimma: Highlight
Smashbox duo cream eyeliner

Lips: Revlon Lip Butter in Creamsicle.
& how I had my nails last week. I basically copied this colour combo from someones look on beautylish because I have wanted to use this blue on my fingernails for a while. All it involves is painting your base colour, and then dabbing a scrunched up piece of clingwrap that has another colour on (different finishes of nail polish that contrast are gorgeous for this look) so it covers a little bit of the nail.
I actually like this look more than crackle as it shows a lot of the base colour as well. Yay :)

Thank you for looking xxx


Wednesday, June 20, 2012

Birthday Makeup! Mod Cat Eye Look.

Go Charlotte, It's your birthday! Yes, I finally turned the big 21. (that's what I said about my 18th, feels like yesterday but its already flown by).
I had some friends around for drinks on Saturday night  and on the night of my birthday (Tuesday) we went out for dinner with the family. I suppose nothing else has changed except now I am actually classed as an adult (How scary!! :P) since I've been able to legally drink & go to clubs since I was 18. But now I can go to the US and do it all as well!
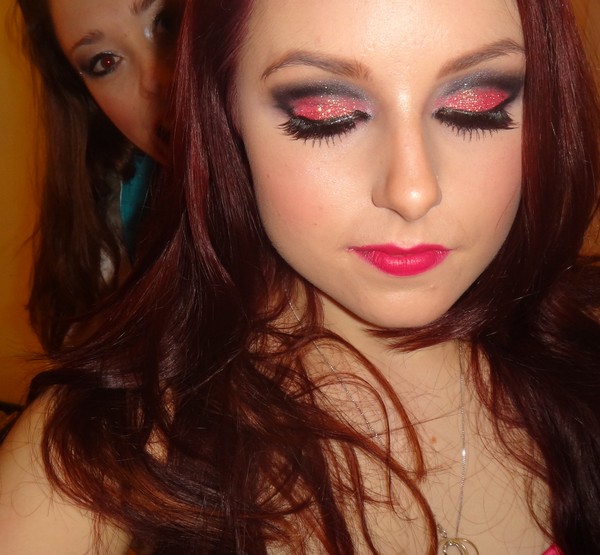
To the makeup.... even though the drinks was pretty casual I wanted to go all glam with the makeup. As you do ;). I thought I would stuff it up but I didn't, woohoo!

My close up pictures were taken before redoing my eyebrows & foundation.
After applying primer, start with a thin brush & black cream/gel eyeliner, drawing the top line just above the crease following the crease curve, and then wing it out & join it to the lashline. Fill in all except the inner corner with the black. Also apply to the lower lashline & waterline.
If you need to clean up the line, use a wet cotton bud to go along the top, and clean up with concealer after.
Using your fave black eyeshadow, apply wherever the base is.
With a glitter liquid eyeliner, apply to the center of the eyelids. Apply a shimmery gray over the top if you wish but make sure the glitter still shines through.
Optional: take some black and make a wing out from the lower lashline parallel to the wing, and inbetween that add some silver glitter swirls.
Apply an intense white highlighter to the inner corner of the eyes.
Apply eyelashes and you're done!
 Click to enlarge

 Products
Face
Australis Paparazzi Perfect Foundation (honestly this is what makes my skin look so flawless. Heavy for everyday but perfect for a night out (and photos!))
Wowzers my skin looks so glowy but I don't remember what I used for it. Maybe mixed a highlighter with my fdtn.
Bourjois Blush 34.

Eyes
Nyx JEP Black Bean (outlining the shape)
Essence Ballerina Backstage Eye Souffle (black- filing in the shape)
Sleek Bad Girl Palette:
Noir, a tiny bit of Underground, over the top of all the black. Mixed a tiny bit of Obnoxious (dark blue) in the lower lash line for depth.
Nyx Candy Glitter liner- Disco Queen (middle of lid)
Bad Girl- Blade (silver) on top of glitter, but added more glitter for it to stand out.
BG- Innocence (Shimmery white to highlight)
Red Cherry Lashes- 43- time to throw these babys out :(

Lips- Inglot 148. & poorly applied at that! Haha, I knew it wouldn't last long.
Aand this is DF & I taking a quick snap on my actual birthday, before going out for dinner with fam & friends.
(yes he's shaving sooon lol)

Thankss sooo much for looking, I hope you like! Oh and if you guys would like to "Like", "Love" or "Luv" (hehe) This look on any of these sites I'd like that :)

Makeup Bee
Beautylish
Makeup Geek

Saturday, June 16, 2012

Glamorous Purple & Gold

 I did this makeup for a friends party 2 weeks ago and I just wanted something glamorous (the theme was beauty & the geek so you know what I went as ;)) & lately I've been obsessed with highlighting the middle of the lid, I'm sure you'll see in many upcoming posts!
 When I first saw the inspiration pic (I will post it down below) I knew exactly which main eye shadows I wanted to use which is why I really wanted to do it hehe.
So without further adieu..


Eeep, with these falsies because they're so thick, you can easily see the mistakes. I think its just the way they're sitting although I did try to push them up.
I look like a bitch! Haha I'm sorry :). When I have to take pictures at night the lighting in the bathroom is the best for not using flash but I have to look up to the light.


Face
Australis Paparazzi Perfect foundation (Nude)
15 Concealer palette (also to contour)
Nyx Cream blush in Glow
MAC Peachykeen with Milani Baked blush in Fantasico Mauve
Nyx Taupe Blush

Eyes
Nyx JEP in Milk
Sugarpill Loose Eyeshadow in Hysterics, applied to the inner & outer corner, also the same for the lower lash line.
MUG e/s in Wisteria blended in the crease
Sleek Rebel from the Bad Girl Palette in the outer corner of lid + lower lash line
Sleek Noir again from same palette in the outer v and to set eyeliner
Fyrianne Pixie Epoxy in the middle of the lid only
Sugarpill Goldilux on middle of lid + lower lash line
MUG e/s in Shimma Shimma to highlight
BYS Gel eyeliner
Red Cherry Lashes- number 71 I think?

Lips
Revlon Matte L/S in Smoked Peach + Nyx Smokey Look L/G


 And of course, the inspiration thanks from a lovely lady at Makeup Alley.

Thanks so much for loooking!!<3 xxx I hope you've all had a good weekend.


Tuesday, June 12, 2012

Burnt Sunset Step by Step with Makeup Geek

So originally this was meant to be a bright, cheerful sunset... then I added too much of a colour, thought I had ruined it, but it actually turned out ok... does this happen to anyone else?? lol. But I went ahead with a step by step anyway just for the sake of it. If I left out the black to begin with it would have probably turned out a whole lot brighter.
I used all Makeup Geek eye shadows...here is the review & swatches for them!
Read on if you want to see how I did this. Also another pic heavy warning!


 Apply your primer and a white base all over and underneath. I used Nyx JEP Milk.
 Apply Razzleberry to the lid with a flat shader brush. Don't worry for now about it looking messy, that'll get fixed up as you go along ;)
  Then with a deluxe crease brush apply Mandarine to the crease blending into the lid colour.
Above that blend Chickadee, going into the inner corner a little bit.
 Repeat steps 2-4 again until you have reached your desired intensity. Blend Chickadee with Vanilla Bean if you need to soften the edges
 Blend Razzleberry + Mandarine onto the lower lashline.
 Using a pointed crease brush apply Corrupt into the outer v. I also highlighted with Shimma Shimma on the browbone & inner corner.
Blend the outer v but not so much to lose the definition. Apply your desired eyeliner, going in as far as you like. I used a cream eyeliner duo from Smashbox.
 Finish the wing & extend it as long as you like, drawing it back onto the outer of the waterliner.
Fill in your eyebrows if you haven't done so already & apply your favourite mascara or falsies. Ignore my lack of eyelashes lol.
I then thought the black was off and slowly blended it into the crease a bit too much, so I applied Burlesque over the top. This gave it that "burnt" effect. It also brought out Chickadee a lot more too. Yayy.

More Pictures~~


Face: As of this moment I am trying to use up a whooole lot of really old products so my foundation & concealer is different from normal. I have pretty much only been wearing this cream blush by Rimmel & blush by BYS. I have also been using a contouring powder from Nude by Nature and highlighting pearls by BYS.


Top L-R: Razzleberry, Manderine, Chickadee
Bottom L-R: Corrupt, Vanilla Bean, Shimma Shimma. Not pictured: Burlesque.
 Man my camera really pulled the brightness out of the colours! To be honest the pans don't look that bright IRL, and chickadee is a bit more orangey.
Eyeliner: Smashbox cream duo. Bourjois Curling mascara. Brows: ELF Eyebrow kit in Medium.

The lipstick is also something I have been trying to use up & its by Mirenesse I don't actually mind it with this look.


Thanks for looking and TIA for any comments <3 <3